Table of Contents
Lab Exercises: Setting Up
This document presents a guide to setting up an environment suitable for running the examples and case studies presented in this module. We assume that you are using some version of Windows. The instructions will have to be adjusted if you are installing the software to a Macintosh or a Unix system. In the Engineering PC lab, the preference is to install the software on on a USB data stick. If you do not have sufficient space, and if your disk quota allows, you can also install the software on the H:\ drive. In the school of engineering labs, you will use the version of the Java Platform Standard Edition Development Kit (JDK) installed at JAVA_HOME=G:\java so will need around 176 Mbytes for Groovy, Grails and the examples, and 242 MBytes if you want to include the Apache Tomcat web container and the Apache Derby database.
In all cases, the installation instructions are kept necessarily brief. Full installation instructions (along with variations for platforms other than Windows) are provided in the on-line documentation for the tools that we are to install.
The total space requirements are summarized in Table 1.
Table 1: Software Needed for this Module
| Software | Current Version | Home Page | Installer | Approx. Installed Size | Notes |
|---|---|---|---|---|---|
| Java SE JDK | Java 1.6 update 13 | java.sun.com/javase | installer | 200 MBytes | Already installed at G:\Java (engineering@swan.ac.uk) |
| Groovy | Groovy 1.6.2 | groovy.codehaus.org | installer | 116 MBytes | Needed for all examples and case-studies |
| Grails | Grails 1.1 | www.grails.org | zip | 50 MBytes | Needed for case-study 5 and the project |
| Apache Tomcat | Tomcat 6.0.18 | tomcat.apache.org | zip or installer1) | 18 MByte | Needed to run the examples from Lecture 13 |
| Apache Derby | Derby 10.4.2.0 | db.apache.org/derby | zip | 48 Mbytes | Needed to run the examples from Lecture 14 |
| Examples and Case Studies | … | at-m42-source.zip | zip | 10 MBytes | all the source code from the notes and case studies |
| Total Space required (All Tools) | 442 Mbytes | 242 MBytes without JDK | |||
For ease of reference I will assume that all software is installed in a folder java in the root of the file system (which I'll assume is a USB datasticked mounted as drive F:). If you install to the H: drive instead, replace F: by H: in the following. Of course, if you install the software on your personal computer, you will need to adjust these instructions accordingly.
Install Java Platform Standard Edition Development Kit (JDK)
This step is not required if you are using the machines in the PC lab. in this case, Java is installed on G:\java.
The JDK comes packaged in a windows installer packaged as a .exe file (jdk-6u13-windows-i586-p.exe). I recommend that you install
the JDK to a F:\java. It will install the JDK into a folder jdk1.6.0_13. You will need to set a user environment variable JAVA_HOME and add %JAVA_HOME%\bin to your path.
From the command line: <cli prompt='>'> F:\java> set JAVA_HOME=F:\java\jdk1.6.0_13 F:\java> set PATH=%JAVA_HOME%\bin;%PATH% </cli>
If you want to make the change permanent, open the System settings dialogue Windows-Pause-Break → Advanced Settings → Environment Variables, and set a new user variable called JAVA_HOME with value F:\java\jdk1.6.0_13 and add %JAVA_HOME%\bin;%PATH% to the user PATH setting.
To test that this has worked, open a new command window (run→cmd) and execute:
<cli prompt=“>”>
F:\java> java -version
java version “1.6.0_13”
Java(TM) SE Runtime Environment (build 1.6.0_13-b03)
Java HotSpot(TM) Client VM (build 11.3-b02, mixed mode, sharing)
</cli>
If the output is as shown above, you have successfully installed the JDK and it is ready for use.
Install Groovy
Groovy is distributed both as a windows installer (groovy-1.6.2-installer.exe at the time of writing) and a zipped binary file. The executable is the most convenient as it will ensure that the environment variable GROOVY_HOME and the windows path is correctly set.
To install choose F:\java\Groovy-1.6.2 as the installation directory. If you use the installer, it will offer to set-up the environment variables for you. If you want to do this manually, the procedure is the same as for Java.
<cli prompt='>'> F:\java> set GROOVY_HOME=F:\java\jdk1.6.0_13 F:\java> set PATH=%GROOVY_HOME%\bin;%PATH% </cli>
The installer will also offer to create native launchers (.exe) files for the command-line tools and a set of additional features. You should probably accept the defaults. It will also offer to add a file association and add groovy to PATHEXT. If you accept these options, your .groovy files will have a special icon and can be double-clicked to execute, like any other kind of windows file.
Once installed, executing groovy from the command line should yield: <cli prompt=“>”> F:\java> groovy -v Groovy Version: 1.6.2 JVM: 1.6.0_13 </cli>
For most of the examples, you will probably find the Ggroovy console (groovyConsole) the most convenient way to interact with the Groovy interpreter and develop groovy scripts and classes. Start it from the command line:
<cli prompt=“>”>
F:\java> groovyConsole
</cli>
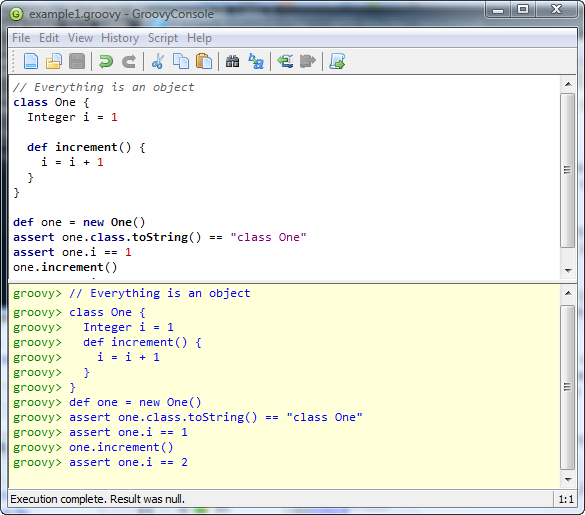
A screen capture of the Groovy console is shown in Figure 1. As you can see the top pane is an interactive shell/editor. The bottom window shows the results of a running the code (or a selection of code) in the upper window. The console includes some simple tools for manipulating your workspace, for example to add extra Java jar files to the classpath, and to inspect the currently-defined variables.
Figure 1: The Groovy console (as it appears in Windows).
The groovy console is good for executing most programs, but if you need to perform keyboard IO or networking applications, you will need to use the groovy command from the windows command line. The online documentation for the examples gives hints on which tool to use in each case.
Install Grails
Steps reproduced from the Grails installation instructions:
- Download the latest Grails release (
grails-bin-1.1.zipat the time of writing). - Extract the archive into an appropriate location; e.g F:\java\grails-1.1 on Windows.
- Create a
GRAILS_HOMEenvironment variable that points to the path where you extracted the archive (egF:\java\grails-1.1on Windows). - Verify that the
JAVA_HOMEenvironment variable has been set and that it points to the path where Java is installed. - Append a reference to the
bindirectory within the Grails directory to yourPATHvariable (eg%GRAILS_HOME%\binon Windows). Note that, for Windows, bothPATHandGRAILS_HOMEmust be defined at the same environment variable level (eg. 'System variables') rather than across environment variable levels (eg.PATHunder 'System variables' andGRAILS_HOMEunder 'User variables'2) - Type
grailsat the command line, if a help message is displayed you are ready to start using Grails!
<cli prompt='>'> F:\java>grails Welcome to Grails 1.1 - http://grails.org/ Licensed under Apache Standard License 2.0 Grails home is set to: D:\java\applications\grails-1.1
No script name specified. Use 'grails help' for more info or 'grails interactive' to enter interactive mode </cli>
Install Tomcat Web Container
Install Apache Derby Database
Download The Source Code
All the source code for the examples and case-studies is available as a downloadable zip file: at-m42-source.zip. Download this script and extract it to somewhere suitable.
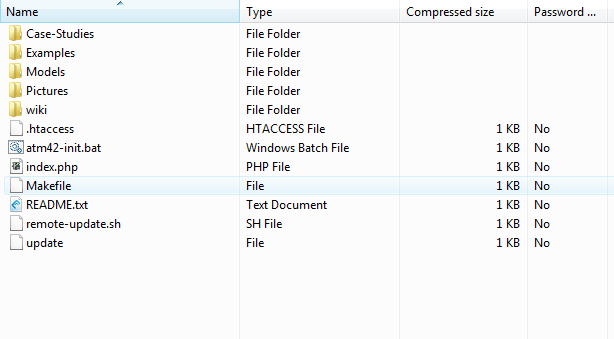
The contents of the source-code distribution file are illustrated in Figure 2.
Figure 2: Examples and case-studies as distributed.
The folder Case-Studies contains the code for the five case-studies. The folder Examples contains the source code for the examples that illustrate the lectures. There are also copies of the UML models (for the UMLet tool) and the pictures and text used in this wiki. The top-level directory and each of the case-study and example folders contains a README.txt file which gives some additional information and, when rendered on-line by the index.php file provides links to each of the examples. The master index is http://www.cpjobling.org.uk/~eechris/at-m42/index.php.
The source-code distribution contains a windows batch file atm42-init.bat. A listing of this file is shown below in Listing 1:
- 1|Listing 1: Initialization Script for AT-M42 Labs
extern> http://www.cpjobling.org.uk/~eechris/at-m42/atm42-init.bat
If you edit the settings for JAVA_HOME, GROOVY_HOME, GRAILS_HOME, DERBY_HOME and AT-M42 (which should point to your downloaded and extracted copy of the source code), you can set up your programming environment without setting the system environment variables.
E.g. <cli prompt=“>”> F:\java> atm42-init.bat
e:\dev\at-m42-2009>REM - Setting up environment AT-M42 Client Server Programming for the Java Platform e:\dev\at-m42-2009>REM - for Groovy/Grails on Windows </cli>
After running this script, the following should open example1 from lecture 2 in the groovy console: <cli prompt=“>”> e:\dev\at-m42-2009> groovyConsole lecture02\example1.groovy </cli>


