Table of Contents
~~SLIDESHOW~~
JavaScript and HTML Documents: Part 1
Contact Hour 11: To be discussed on Wednesday 20th February, 2013.
Lecturer: Dr Chris P. Jobling.
This lecture describes some of the client-side web programming features of JavaScript.
JavaScript and HTML Documents: Part 1
- Client-side JavaScript defines a collection of objects, methods and properties that allow scripts to interact with HTML documents on the client.
- This lecture describes some of these features.
The slides and notes in this lecture are based on Chapter 5 of Robert W. Sebasta, Programming the World-Wide Web, 3rd Edition, Addison Wesley, 2006. and Chapter 7 of Chris Bates, Web Programming: Building Internet Applications, 3rd Edition, John Wiley, 2006.
Contents of this Lecture
Manipulating web documents through the Document Object Model (DOM) and the JavaScript event model.
Learning Outcomes
At the end of this lecture you should be able to answer these questions:
- Global variables in JavaScript are properties of what object?
- How are HTML elements and attributes represented in the JavaScript binding to DOM?
- What is an event?
- What is an event handler?
Learning Outcomes (continued)
At the end of this lecture you should be able to answer these questions:
- What are the two ways in which an event handler can he associated with an event generated by a specific HTML element in the DOM 0 event model?
- Why should
document.writenot be used in an event handler? - In what ways can an HTML element acquire focus?
Learning Outcomes (continued)
At the end of this lecture you should be able to answer these questions:
- Describe the approach to addressing HTML elements using forms and elements.
- Describe the approach to addressing HTML elements using
nameattributes. - Describe the approach to addressing HTML elements using
getElementById.
JavaScript Execution Environment
- The JavaScript
Windowobject represents the window in which the browser displays documents - The
Windowobject provides the largest enclosing referencing environment for scripts- All global variables are properties of
Window
- Implicitly defined
Windowproperties:document– a reference to theDocumentobject that the window displaysframes– an array of references to the frames of the document
The Document object
- Every Document object has:
forms– an array of references to the forms of the document- Each
Formobject has anelementsarray, which has references to the form's elements
Documentalso has arrays foranchors,links, andimages
The Document Object Model
- DOM 0 is supported by all JavaScript-enabled browsers (no written specification)
- DOM 1 was released in 1998
- DOM 2 is the latest approved standard – supported by most (all?) modern browsers
- The DOM is an abstract model that defines the interface between HTML documents and application programs – an API
- Latest DOM specifications are kept at the W3C
<note> DOM 2 is the latest approved standard:
- Nearly completely supported by Mozilla-based browsers
- IE6 support is lacking some important things
- Will be complete in IE7?
The HTML5 specifications are intended to be much more precise about what the DOM is and how it should react to user behaviours. </note>
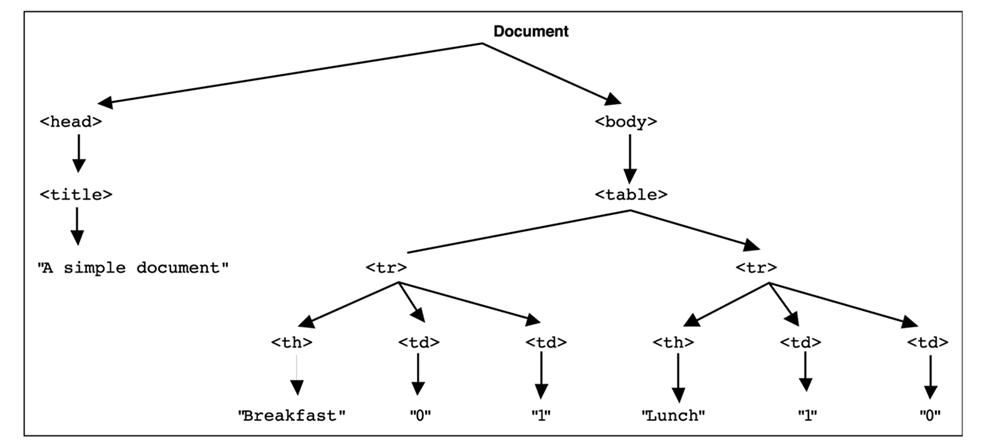
A simple document
<html>
  <head> <title> A simple document </title>
  </head>
  <body>
    <table>
      <tr>
        <th> Breakfast </th>
        <td> 0 </td>
        <td> 1 </td>
      </tr>
      <tr>
        <th> Lunch </th>
        <td> 1 </td>
        <td> 0 </td>
       </tr>
    <table>
  </body>
</html>
Load code dom.html
DOM Structure for Simple Document
The Document Object Model (continued)
- A language that supports the DOM must have a binding to the DOM constructs
- In the JavaScript binding, HTML elements are represented as objects and element attributes are represented as properties
DOM Element as JavaScript object
For example:
<input type = "text" name = "address" />
would be represented as an input object with two properties, type and name, with the values "text" and "address". E.g:
input = {
  type: "text",
  name: "address"
};
Element Access in JavaScript
There are several ways to do it
An Example
Example (a document with just one form and one widget):
<form action = "">
  <input type = "button"  name = "pushMe" value="Push Me" />
</form>
Rendered as:
<html> <form action = “”>
<input type = "button" name = "pushMe" value="Push Me" />
</form> </html>
Load code form.html
1. Element Access by Array Index
- DOM address:
var button = document.forms[0].elements[0]
- Problem: solution is fragile if document changes, indices may be wrong
For example if another form is added before this one, or another widget is added before the button.
2. Element Access by Name
- requires the element and all of its ancestors (except body) to have
nameattributes
    <form name = "myForm"  action = "">
       <input type = "button"  name = "pushMe" value="Push Me" />
    </form>
- Button pushMe can be accessed by:
var button = document.forms[0].pushMe
- Problem: XHTML 1.1 specification doesn't allow the
nameattribute on form elements! - HTML5 does allow name and a form can be addressed by name if either name or id is set (presumably name is used if both are present).
3. Element Access by Id
getElementByIdmethod (defined in DOM 1)
    <form action = "">
      <input type = "button"  id = "pushMe"  value="Push Me" />
    </form>
- Button now accessed as:
var button = document.getElementById("pushMe")
This is the safest method, and is the most widely adopted convention. It does require that each widget be given a unique id.
4. Element Access by CSS selector - jQuery
- Using jQuery CSS selector (more later)
    <form action = "">
      <input type = "button"  id = "pushMe"  value="Push Me" />
    </form>
- Button now accessed as:
var button = $("#pushMe");
As jQuery has become almost a standard part of the developer's toolbox, this way of accessing a DOM element by CSS selector is almost certain to work. You do need to include jQuery as an external library of course.
Check Box/Radio Button Access
- Check boxes and radio buttons have an implicit array, which has their name
    <form id = "topGroup">
      <input type = "checkbox"  name = "toppings" value = "olives" /> Olives</br />
      <input type = "checkbox"  name = "toppings" value = "tomatoes" /> Tomatoes
    </form>
- Rendered:
<html>
  <form id = "topGroup">
    <input type = "checkbox"  name = "toppings" value = "olives" /> Olives<br />
    <input type = "checkbox"  name = "toppings" value = "tomatoes" /> Tomatoes
  </form>
</html>
Load code radiobuttons.html
Check Box/Radio Button Access (continued)
- Check-box items could be accessed by this script:
var numChecked = 0;
var dom = document.getElementById("topGroup");
 for (index = 0; index < dom.toppings.length; index++) {
  if (dom.toppings[index].checked) {
    numChecked++;
  }
}
Mini exercise: Modify the above to generate an array of toppings.
Events and Event Handling
- An event is a notification that something specific has occurred, either with the browser or an action of the browser user
- An event handler is a script that is implicitly executed in response to the appearance of an event
- The process of connecting an event handler to an event is called registration
- Don't use
document.writein an event handler, because the output will probably replace the current DOM
The Standard Events and their Handlers
| Event | Tag Attribute | Event | Tag Attribute |
|---|---|---|---|
blur | onblur | mouseout | onmouseout |
change | onchange | mouseover | onmouseover |
click | onclick | mouseup | onmouseup |
focus | onfocus | select | onselect |
load | onload | submit | onsumbit |
mousedown | onmousedown | unload | onunload |
mousemove | onmousemove |
Events and Event Handling (continued)
- The same attribute can appear in several different tags
- e.g., The
onclickattribute can be in<a>and<input>
Handling Events from Text Elements
A text element gets focus in three ways:
- When the user puts the mouse cursor over it and presses the left button
- When the user tabs to the element
- By executing the focus method
Event Attributes: onblur
- The
onblurattribute
| Tag | Description |
|---|---|
<a> | The link loses focus |
<button> | The button loses the input focus |
<input> | The input element loses the input focus |
<textarea> | The text area loses the input focus |
<select> | The selection element loses the input focus |
Event Attributes: onchange
- The
onchangeattribute
| Tag | Description |
|---|---|
<input> | The input element is changed and loses the input focus |
<textarea> | The text area is changed and loses the input focus |
<select> | The selection element is changed and loses the input focus |
Event Attributes: onclick
- The
onclickattribute
| Tag | Description |
|---|---|
<a> | The user clicks on the link |
<input> | The input element is clicked |
Event Attributes: onfocus
- The
onfocusattribute
| Tag | Description |
|---|---|
<a> | The link receives the input focus |
<input> | The input element receives the input focus |
<textarea> | The text area receives the input focus |
<select> | The selection element receives the input focus |
Event Attributes: onload
- The
onloadattribute
| Tag | Description |
|---|---|
<body> | The document is finished loading |
Event Attributes: Mouse Events
- Apply to most elements
| Tag | Description |
|---|---|
onmousedown | The user clicks the left mouse button |
onmousemove | The user moves the mouse cursor within the element |
onmousout | The mouse cursor is moved away from being over the element |
onmouseover | The mouse curse is moved over the element |
onmouseup | The left mouse button is released |
Event Attributes: onselect
- The
onselectattribute
| Tag | Description |
|---|---|
<input> | The mouse cursor is moved over the element |
<textarea> | The text is selected within the text area |
Event Attributes: onsubmit, onunload
| Attribute | Tag | Description |
|---|---|---|
onsubmit | <form> | The Submit button is pressed |
onunload | <body> | The user exits the document (source of annoying pop-ups) |
Registering Event Handlers
Event handlers can be registered in two ways:
Assigning the event handler to an event tag
onclick = "alert('Mouse click!');"
onclick = "myHandler();"
Assigning an event handler as a property of an element
document.getElementById("myButton").onclick = myHandler;
Handling Events from Body Elements
<note warning> This script seems to make the latest version of Firefox hang completely. I'm not sure if it's a Firefox bug or some strange interaction with the extensions I have installed.
It seems to work fine in Chrome, Opera and Safari. I don't have access to Internet Explorer for testing. </note>
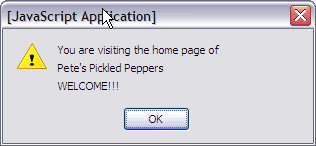
Example: load.html uses the load event – triggered when the loading of a document is completed
- Code :
<!DOCTYPE html>
<!-- template HTML file -->
<html class="no-js" lang="en">
  <head>
    <meta charset="utf-8">
    <meta http-equiv="X-UA-Compatible" content="IE=edge,chrome=1">
    <title>Onload event</title>
    <meta name="viewport" content="width=device-width">

    <link rel="stylesheet" href="css/bootstrap.min.css">
    <link rel="stylesheet" href="css/bootstrap-responsive.min.css">
    <link rel="stylesheet" href="css/main.css">

    <script src="js/vendor/modernizr-2.6.2-respond-1.1.0.min.js"></script>
  </head>
  <body onload="load_greeting();">
    <div class="container">
      <h1>Onload event</h1>


    </div> <!-- /container -->

    <script src="//ajax.googleapis.com/ajax/libs/jquery/1.9.0/jquery.min.js"></script>
    <script>window.jQuery || document.write('<script src="js/vendor/jquery-1.9.0.min.js"><\/script>')</script>

    <script src="js/vendor/bootstrap.min.js"></script>
    <script src="js/plugins.js"></script>
    <!-- Any external JS loaded here -->
    <script>
      // The onload event handler

      var load_greeting = function () {
        alert("You are visiting the home page of \n" + "Pete's Pickled Peppers \n" + "WELCOME!!!");
      };
    </script>
  </body>
</html>
- Result:
Handling Events from Button Elements
- Plain Buttons – use the
onclickproperty - Radio buttons
- If the handler is registered in the markup, the particular button that was clicked can be sent to the handler as a parameter
- This is another way of choosing the clicked button
<note>
If the handler is registered in the markup, the particular button that was clicked can be sent to the handler as a parameter
* e.g., if planeChoice is the name of the handler and the value of a button is 172, use:
onclick = "planeChoice(172)"
</note>
Handling Events from Button Elements — Example
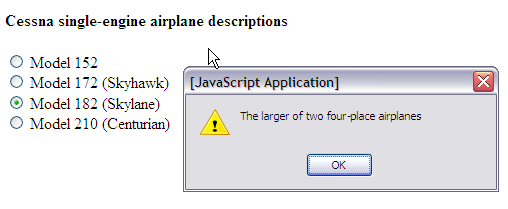
- This example (radio_click.html) illustrates use of the click event with radio buttons, registering the event handler by assignment to the button attributes.
- Code:
<!DOCTYPE html>
<!-- radio_click.hmtl
An example of the use of the click event with radio buttons,
registering the event handler by assignment to the button
attributes -->
<html class="no-js" lang="en">
  <head>
    <meta charset="utf-8">
    <meta http-equiv="X-UA-Compatible" content="IE=edge,chrome=1">
    <title>Illustrate messages for radio buttons</title>
    <meta name="viewport" content="width=device-width">

    <link rel="stylesheet" href="css/bootstrap.min.css">
    <link rel="stylesheet" href="css/bootstrap-responsive.min.css">
    <link rel="stylesheet" href="css/main.css">

    <script src="js/vendor/modernizr-2.6.2-respond-1.1.0.min.js"></script>
  </head>
  <body>
    <div class="container">
      <h1>Illustrate messages for radio buttons</h1>

      <h2> Cessna single-engine airplane descriptions </h2>
      <form id = "myForm"  action = "handler">
        <p>
          <input type = "radio"  name = "planeButton"  value = "152"
                 onclick = "planeChoice(152)" />
            Model 152 <br />
         <input type = "radio"  name = "planeButton"  value = "172"
                onclick = "planeChoice(172)" />
            Model 172 (Skyhawk) <br />
         <input type = "radio"  name = "planeButton"  value = "182"
                onclick = "planeChoice(182)" />
            Model 182 (Skylane) <br />
         <input type = "radio"  name = "planeButton"  value = "210"
                onclick = "planeChoice(210)" />
            Model 210 (Centurian)
         </p>
      </form>

    </div> <!-- /container -->

    <script src="//ajax.googleapis.com/ajax/libs/jquery/1.9.0/jquery.min.js"></script>
    <script>window.jQuery || document.write('<script src="js/vendor/jquery-1.9.0.min.js"><\/script>')</script>

    <script src="js/vendor/bootstrap.min.js"></script>
    <script src="js/plugins.js"></script>
    <!-- Any external JS loaded here -->
    <script>
      // The event handler for a radio button collection

      var planeChoice = function(plane) {

        // Produce an alert message about the chosen airplane

        switch (plane) {
          case "152":
            alert("A small two-place airplane for flight training");
            break;
          case "172":
            alert("The smaller of two four-place airplanes");
            break;
          case "182":
            alert("The larger of two four-place airplanes");
            break;
          case "210":
            alert("A six-place high-performance airplane");
            break;
          default:
            alert("Error in JavaScript function planeChoice");
            break;
        };
      }
    </script>

  </body>
</html>
- Result
Handling Events from Button Elements — jQuery Example
- This second example (radio_click_jquery.html) illustrates the use of jQuery's CSS selector, which returns all matched elements, can be used to simultaneously attache a click event to all radio buttons at the same time. We will introduce jQuery more formally in a later session.
- Code:
<!DOCTYPE html>
<!-- radio_click_jquery.hmtl
An example of the use of the click event with radio buttons,
registering the event handler by assignment to the button
attributes. This version has been don using jQuery. -->
<html class="no-js" lang="en">
  <head>
    <meta charset="utf-8">
    <meta http-equiv="X-UA-Compatible" content="IE=edge,chrome=1">
    <title>Illustrate messages for radio buttons</title>
    <meta name="viewport" content="width=device-width">

    <link rel="stylesheet" href="css/bootstrap.min.css">
    <link rel="stylesheet" href="css/bootstrap-responsive.min.css">
    <link rel="stylesheet" href="css/main.css">

    <script src="js/vendor/modernizr-2.6.2-respond-1.1.0.min.js"></script>
  </head>
  <body>
    <div class="container">
      <h1>Illustrate messages for radio buttons</h1>

      <h2> Cessna single-engine airplane descriptions </h2>
      <form id = "myForm"  action = "handler">
        <p>
          <input type = "radio"  name = "planeButton"  value = "152">
            Model 152 <br />
         <input type = "radio"  name = "planeButton"  value = "172">
            Model 172 (Skyhawk) <br />
         <input type = "radio"  name = "planeButton"  value = "182">
            Model 182 (Skylane) <br />
         <input type = "radio"  name = "planeButton"  value = "210">
            Model 210 (Centurian)
         </p>
      </form>

    </div> <!-- /container -->

    <script src="http://ajax.googleapis.com/ajax/libs/jquery/1.9.0/jquery.min.js"></script>
    <script>window.jQuery || document.write('<script src="js/vendor/jquery-1.9.0.min.js"><\/script>')</script>

    <script src="js/vendor/bootstrap.min.js"></script>
    <script src="js/plugins.js"></script>
    <!-- Any external JS loaded here -->
    <script>
      $(document).ready(function() {
        // The event handler for a radio button collection

        var planeChoice = function(plane) {

          // Produce an alert message about the chosen airplane

          switch (plane) {
            case "152":
              alert("A small two-place airplane for flight training");
              break;
            case "172":
              alert("The smaller of two four-place airplanes");
              break;
            case "182":
              alert("The larger of two four-place airplanes");
              break;
            case "210":
              alert("A six-place high-performance airplane");
              break;
            default:
              alert("Error in JavaScript function planeChoice");
              break;
          }
        };

        // Register the events
        $('#myForm input[type="radio"]').on('click', function(event) {
          planeChoice($(this).val());
        });
      });
    </script>

  </body>
</html>
Summary of this Lecture
Manipulating web documents through the Document Object Model (DOM) and the JavaScript event model.
Learning Outcomes
At the end of this lecture you should be able to answer these questions:
- Global variables in JavaScript are properties of what object?
- How are HTML elements and attributes represented in the JavaScript binding to DOM?
- What is an event?
- What is an event handler?
Learning Outcomes (continued)
At the end of this lecture you should be able to answer these questions:
- What are the two ways in which an event handler can he associated with an event generated by a specific HTML element in the DOM 0 event model?
- Why should
document.writenot be used in an event handler? - In what ways can an HTML element acquire focus?
Learning Outcomes (continued)
At the end of this lecture you should be able to answer these questions:
- Describe the approach to addressing HTML elements using forms and elements.
- Describe the approach to addressing HTML elements using
nameattributes. - Describe the approach to addressing HTML elements using
getElementById.
There are a few more review questions available.
Homework Exercises
- Modify the
radio_click.htmlexample to have five radio buttons, labelled “red”, “blue”, “green”, “yellow”, and “orange”. The event handlers for these buttons must produce messages stating the chosen favourite colour. The event handler must be a function, whose name must be assigned to theonclickattribute of the button elements. The chosen colour must be sent to the event handler as a parameter. - Rewrite the document for Exercise 1 to assign the event handler to the event property of the button element. This requires the chosen colour to be obtained from the value property of the button element rather than through the parameter.
What's Next?
More on the event model, using events for form validation, and the DOM 2 event model.


